

In this article I will teach Mathcad Step by Step Tutorials for Beginners. Advance topic will be discussed in another article. There are two parts on this article. The first part is about software familiarization while the second part is about Mathcad computations.
Mathcad Step by Step Tutorials for Beginners Part 1: Software Familiarization
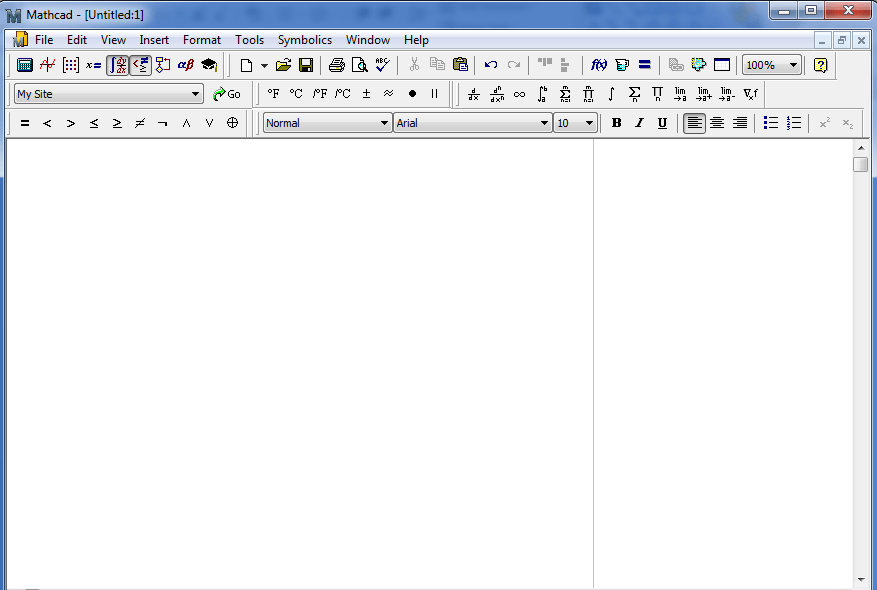
Open Mathcad software. A blank page will show as Figure 1.

- Figure 1
We will get to know the menus.

- Figure 2

The File Menu

- Figure 3

New – Start a new or a blank worksheet
Open – open an existing file or saved file
Save, Save as, Save as Web Page– saving options
Page Setup – you can change the worksheet size here and so on. See Figure 4.

- Figure 4

Print – print the worksheet
Print Preview – previewing the worksheet before printing. In MathCAD 14, this feature is not working well. Every time you preview the page it will result to error (you can try it anyway).
Send – sends the worksheet through your outlook
Properties – just a file property. You may not alter this.
The Edit menu

- Figure 5

Undo, Redo – Self explanatory. Short cuts, CTRL+Z and CTRL+Y
Cut, Copy, Paste – Self explanatory. Short cuts; CTRL+X, CTRL+C, CTRL+V
Paste Special – pasting a particular item with a specific file format. See Figure 6.

- Figure 6

Delete – delete a word, equation, image, etc. To delete, highlight the subject for delete then press delete. You can use CTRL+D.
Select All – highlights all the entries in the worksheet, short cut; CTRL+A
Find – use to find a certain variable. Short cut; CTRL+F
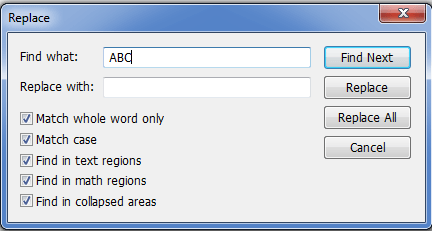
Replace – a certain variable. In Figure 7, enter the variable to be replaced in “Find what” and then enter the new variable to replace in “Replace with”. When you enter the variable that you want to replace and then click “Find Next”, it will highlight one by one the variable name it finds in the worksheet. If you only want to replace a single or a specific variable, just click replace once the desired variable is highlighted. On the other hand, if you click “Replace all”, it will replace all the variable name it finds matched with the entered variable.

- Figure 7
Go to Page – With this, you can jump to any page number you wanna go.

- Figure 8

The View Menu

- Figure 9
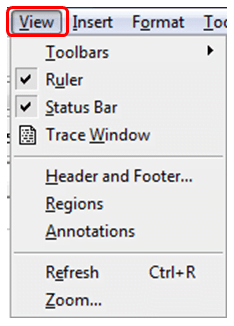
Toolbars – You can hide or unhide toolbars here by checking or unchecking the boz on the left.

- Figure 10

Ruler – when this is enabled (checked), a ruler will appear in the upper area of the worksheet
Status Bar – A status bar will appear in the footer section of the worksheet
Trace Window – this is an advance tool that lets you do debugging
Header and Footer – you can setup your header and footer
Insert Menu

- Figure 11
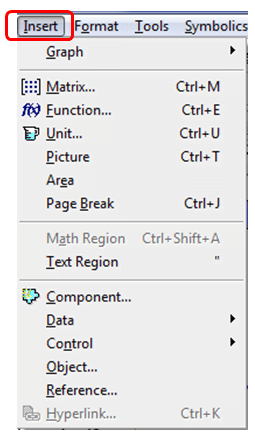
We will only discuss the basic items in the insert menu anyway, once you always use MathCAD you will get familiar to all these.
Graph – you can insert graphs of your choice
Matrix – you can insert matrix
Function – you can insert function trigonometry, complex numbers, hyperbolic, etc
Picture – you can add picture
Area – this menu helps you hide and unhide a certain region in the worksheet
Page Break – Mark the end of every page. This is important especially when you print your worksheet.
Text Region – a region where you can insert a plain text
Component – this is an advance tool where you can use data from excel, MATLAB, ODBC, ect

- Figure 12

Data – also and advance tool, same with the Component, you can use MATLAB data, database, excel, etc.
Control – also an advance tool, you can insert push buttons, radio button, text box, etc.
Object – this is also an advance tool, this allows you to use data created outside MathCAD
Reference – just a reference path of your worksheet if you want to put any
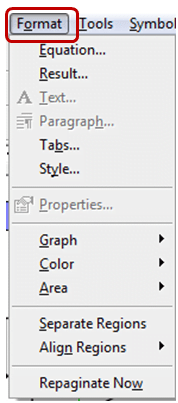
Format Menu
This is more on beautification of your worksheet. You can change the color, settings of your graphs, styles, etc.

- Figure 13
Tool Menu

- Figure 14
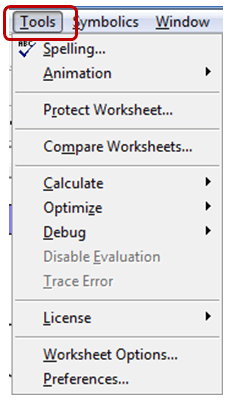
In here you can you can check the spelling if you want or protect your worksheet or compare worksheets. You can also borrow or returm license here. Under the calculate button, it is important to check the “Automatic Calculation” to automatically compute your worksheet. Under “Worksheet Options” you can specify the unit system yu want to use, you can change the display, dimensions, calculation, etc. You may not alter these.
Symbolics Menu

- Figure 15
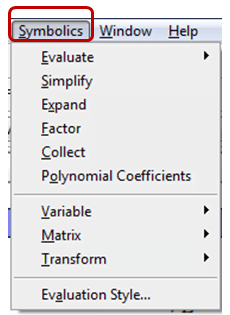
Under “Symbolics” you can simplify equations automatically instead of doing it conventionally (long hand method). We will have example on this later (below parts).
Window Menu
If you have many worksheets open, all these will show in this menu. You can select anytime to what worksheet to be activated.
Help Menu
The documentation of the software.
Mathcad Step by Step Tutorials for Beginners Part 1: Simple Computations
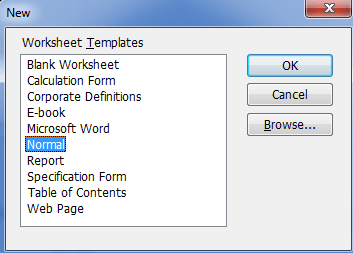
Step 1: Click on “File” then “New” and select “Normal” on the window below. You can also choose a blank worksheet if you want.

- Figure 16
After doing step 1, a new blank sheet will show.
Step 2: Defining Variable Values
MathCAD always do computations based from the data above a particular expression of equation. For example, if you define an expression Area = L*W, the value of L and W must be declared above the equation, otherwise will result to error.
On the blank worksheet, input:
Length = 10meters and Width = 10meters also. Just click the keyboard equal symbol to put the equal sign in the equation.
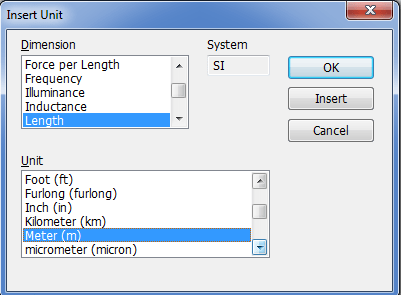
To select meter, you can go to “Insert”à “Unit” then a window will popup. Under the Dimension, select Length and then select meters under the Unit section.

- Figure 17
Another way of inserting unit is using the cup like icon in the toolbar section as Figure 18 shown. In either method you have to take note that after typing the number 10, do not put any space because a space will tell MathCAD that you want to input a plain text and not a variable.

- Figure 18

After defining the variables, you can now formulate the equation of Area which equals Length*Width in this tutorial. So, you must get below result.

- Figure 19

Step 3: Adjusting Font and Putting a Text on the Worksheet
To modify the font of a variable, click to any variable and then start customizing through the menus highlighted in Figure 20. You can do the same process if you want to modify the constants. Note: Variables are the one handling constants. Length is the variable while 10m is the constant.

- Figure 20

To enter a text in your worksheet, type the text you want in the location you desired the text to appear then press keyboard space bar. Any space will make the MathCAD engine to disable calculation.
Step 4: Exploring the Symbolic Tools
In step 2, we learned the basic computations in MathCAD. Here we are going to use the symbolic tools. You may create a new worksheet. In symbolic computation, not necessary that you assign a value in every variable, it can solve variable unknowns.
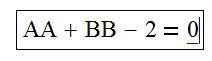
Enter below equation in your worksheet.
AA+BB-2=0
AA and BB are both variable. In here, the equal sigh is not the same to the equal sign we use in step 2. The equal sign here is a Boolean equality that you can get from the toolbox in the header as shown in Figure 21.

- Figure 21

Another approach is by pressing the keyboard control button then pressing equal button.
Once you already formulated the equation, we will solve the value of AA. To do so, put the mouse cursor in the right side of zero same with Figure 22.

- Figure 22
Then click the icon boxed in red in Figure 23.

- Figure 23

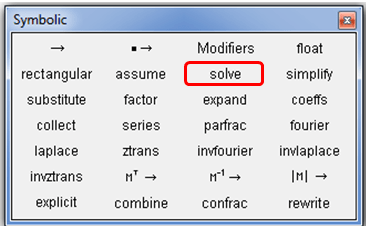
The symbolic toolbar will show up as shown in Figure 24. Then click solve then coma and type AA then left click. The value of AA will be pointed by the arrow as Figure 25.

- Figure 24

- Figure 25
We will stop here and stay tune for the advanced topics.